Install VTS on a single workstation (stand-alone scenario)
This page includes the quick steps for installing the VTS software in a stand-alone scenario configuration.
Select the Print button within Help to print out this page.

|
Only ITC sites are authorized to configure the stand-alone scenario for exam delivery. Please contact your local Pearson VUE Support Specialist if you have any questions regarding this issue. |
1. Set network location
See Set network location on stand-alone workstation topic for details. You must ensure the network location is set to Private network.
- Open the Network and Sharing Center dialog box.
- Click in the Search field on the Windows Task bar.
- Type Network in the Search field.
- Locate Network and Sharing Center in the list and select the link.
- Select the Change advanced sharing settings link.
- Expand the Private networks location.
- Set Network discovery to On.
- Select Close and then close the Network and Sharing Center dialog box.
2. Configure the firewall
See Configure the firewall/proxy server - stand-alone scenario topic for more details.
- The following ports must be open.
- Apps.pearsonvue.com - port 443
- Gk6.pearsonvue.com - port 15000 (port 80 for military sites)
- Caic1.pearsonvue.com - port 80
- The actual destinations are the IP ranges 159.182.111.1 to 159.182.111.254 and ports 80, 443 and 15000 must be open for full outbound traffic, with no packet filtering. Ports 443 and 2488 must also be open internally between the server and the deliveries for the site services agent to run.
|
Military sites are not required to open 15000 for full outbound traffic. |
- Those three domains will also have to be allowlisted on your proxy, along with gk6upd.pearsonvue.com. (Gatekeeper for the update servers.)
3. Configure Internet options
Open the Internet Properties dialog box.
- Click in the Search field on the Windows Task bar.
- Type Internet in the Search field.
- Locate Internet Options in the list and select the link.
- Select the Privacy tab.
- Deselect Turn on Pop-up Blocker and select OK.
4. Create VUEService account
See Create a service user account (VUE Wrapper account) - stand-alone scenario and Assign Local Security Policy Rights - stand-alone scenario topics for more details
- Open the Computer Management dialog box.
- Select the Windows Start button.
- Scroll down and expand the Windows Administrative Tools menu.
- Select Computer Management.
- Select the Windows Start button.
- Select the All apps menu in the upper right-hand corner.
- Scroll down and select the Windows Tools menu.
- Double-click Computer Management. The Computer Management dialog box opens.
- Expand the Local User and Groups list.
- Right-click on Users and select New User from the pop-up menu. Enter the following:
- User name: VUEService
- Password: any
- User must change password at next logon: unselected
- User cannot change password: selected
- Password never expires: selected
- Select Create and Close.
- Double-click VUEService user.
- Select the Member Of tab and select Add.
- Type Administrators in the Enter the object names to select field and select OK and then OK again.
- Select the Windows Start | Programs | Administrative Tools menu.
- Select Local Security Policy.
- Click in the Search field on the Windows Task bar.
- Type Local Security Policy in the Search field and hit the Enter key on the keyboard.
- Expand Local Policies and then select the User Rights Assignment folder.
- Add the VUEService account to the following policies:
- Act as part of the operating system
- Allow log on locally
- Log on as a service
5. Disable services
See Disable services - stand-alone topic for details.
The following services must be disabled on ALL exam delivery workstations before installing and using the VUE Testing System:
- File History Service
- SMS Remote Control Agent
- Remote Desktop Services
- Utility Manager
- VNC Server
Open the Windows Services window.
- Click in the Search field on the Windows Task bar.
- Type Services in the Search field.
- Select the View local services link.
- Locate and double-click the desired service listed above.
- If the service is started, select the Stop button.
- Select Yes if a warning message appears.
- Select Disabled from the Startup type drop-down list and select OK.
- Repeat these steps for each of the services.
- Close the Services and Administrative Tools or Settings dialog boxes.
6. Install VTS on stand-alone workstation
See Install the stand-alone scenario for details.
- Log into the Connect portal at: https://connect.pearsonvue.com.
- Enter your Username, Password, and Site ID, and select Login.
- Download the VTS 2.3.xxxx installer from the Connect portal in the Resources\Support materials\Testing Systems Application + Support Files folder.
- Run the installer and select Next in the Welcome dialog box.
- Select Yes in the License Agreement box and select Yes to confirm.
- Choose Standalone scenario, select Next.
- Select Next to accept the default Location.
- Keep the VUE share and select Next.
- In the Network connection dialog box, keep the default Port numbers of 443 and 2488. Make sure Open firewall exceptions for the selected port numbers check box is selected and select Next.
- In the Wrapper Service User dialog box, enter the VUEService account and password.
- Domain: (local computer name)
- Username: VUEService
Password: (password you created)
Confirm Password: (password you created) - Select Next in the Start Copying Files dialog box.
- Check the sharing and security permissions on the VUE share and set Authenticated Users to Allow Read & execute, List folder contents, Read, and Write.
- Restart the Administration workstation when prompted.
7. Download the site license and security certificate
You must retrieve the two security files required to authenticate VTS to the Pearson VUE Hub.
- Open a web browser and navigate to the Connect portal at: https://connect.pearsonvue.com
- Enter your Username, Password, and Site ID, and select Log in.
- Select the Site system information menu if it is not already selected.
- Select the Download host.crd file link. Move the host.crd file to the C:\Pearson VUE\VUE Testing System\db directory.
- Select the Download host.p12 file link. Move the host.p12 file to the C:\Pearson VUE\VUE Testing System\db directory.
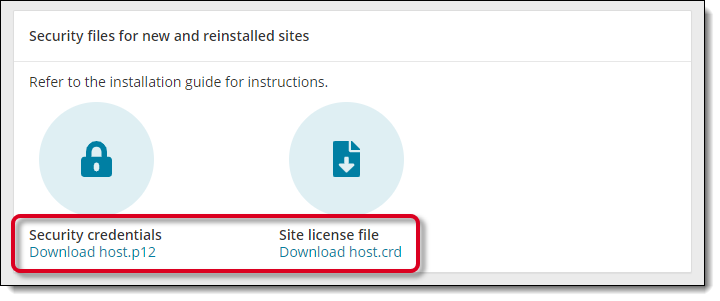
- If these files have already been downloaded, contact VUE Support Services (Contacts) to have the files reset.
8. Start manual update on administration workstation/server
- Select the Windows Start button and select the All Apps | VUE Applications | Start Manual Update menu.
- Select Yes in the User Account Control dialog box.
- Enter your User Name and Password in the Login dialog box and select OK.
- Select the version you wish to install and select Install.
- Reboot the workstation when prompted.
9. Install the nightly maintenance wrapper task
- Open the Services dialog box.
- Click in the Search field on the Windows Task bar.
- Type Services in the Search field.
- Locate Services Desktop app in the list and select the link.
- Click in the Search field on the Windows Task bar.
- Type Services in the Search field and hit the Enter key on the keyboard.
- Select the Windows Start button and select the Control Panel | Administrative Tools | Services menu.
- Double-click Services.
- Double-click on Task Scheduler.
- Select Automatic from the Startup type drop-down list, select the Start button and select OK.
- Close the Services and Administrative Tools dialog boxes.
- Open Windows Explorer and navigate to the C:\Pearson VUE\VUE Testing System\app\Utilities folder.
- Double-click the WrapperCycle.bat file to launch the utility setup. A Command Prompt window opens and instructs you to press any key to continue.
- Double-click the WrapperCycleW10.cmd file to launch the utility setup. A Command Prompt window opens and instructs you to press any key to continue.
- Ensure the vrun.exe process is running in Task Manager.
10. Install admissions equipment
- Install any necessary admissions equipment drivers from the Resources\Support materials\Testing Systems Application + Support Files folder on the Connect portal.
|
What is next? |
Pearson VUE Proprietary and Confidential