Using the Entry Monitoring pane
|
|
The Entry Monitoring pane in Admissions Manager appears only at certain test centers, such as PVTC Selects. If your test center has this feature in Admissions Manager, follow the process in this section to handle entry and exit monitoring. Your test center will not see this pane in Admissions Manager if it is not required. |

Follow these steps to perform entry and exit monitoring in Admissions Manager:
-
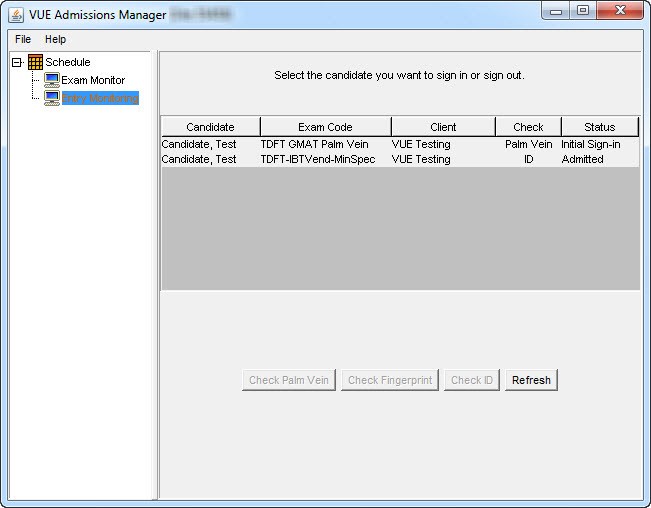
Click the Entry Monitoring icon in the left pane of the Admissions Manager window.
The Entry Monitoring pane displays a list of candidates. The window also lists which exam the candidate is taking and the type of entry monitoring the exam sponsor requires (palm scan, palm vein, or manually checking ID). For more information, see About the Entry Monitoring pane.
-
Select the candidate on the screen to activate at least one of the buttons below the candidate list.
If the exam sponsor does not require palm scan or palm vein verification, only the Check ID button becomes active.
-
Look at the Check column to see whether the exam sponsor requires you to check the candidate's palm scan, palm vein, or ID. Follow the steps in one of the sections listed below, depending on what you need to verify in Entry Monitoring:
|
|
If the admission tablet or palm vein device is not available and an exam sponsor requires palm scan or palm vein verification, select Check ID to manually check the candidate's ID. A warning message appears asking if you are sure you want to proceed. Select Yes only if you need to manually check the candidate's ID. Select No to return to the candidate list. If you select Yes, see Manually checking ID in Entry Monitoring for further direction. |
Copyright © 2026 Pearson, Inc. or its affiliates. All rights reserved. Pearson Confidential.