Steps to capture and verify a photograph
|
|
If the camera is not working properly, see Backup photograph processes. |
If you see the "Capture photograph" step in Admissions Manager, the exam sponsor requires you to take the candidate's photograph. However, a candidate can sometimes request to be excused from having their photograph taken for religious reasons. For more information, see Waiving the photograph for religious reasons.
If you have questions about a candidate's photograph and are not sure what to do, see the exam sponsor's documentation. If there are any issues or problems related to the candidate's photograph, create a case.
|
|
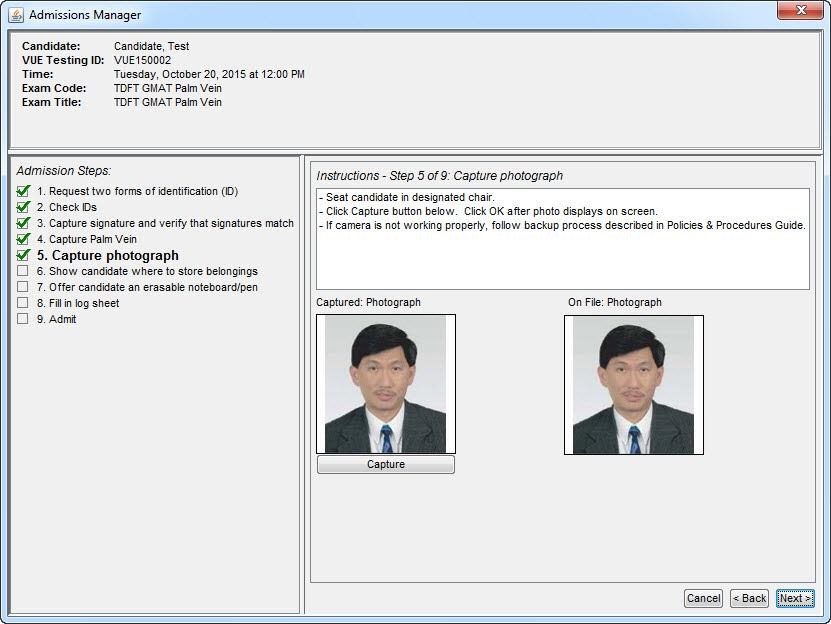
A candidate may already have an existing photograph in the database that was taken during a previous admission. If so, it appears in Admissions Manager. Though a photograph already exists, you must capture a new photograph, as outlined in this section. The new photograph replaces the existing one in the database. |
Follow these steps to take a candidate's photograph:
-
When the Capture Photo window appears, tell the candidate to sit in the designated chair near the administration workstation.
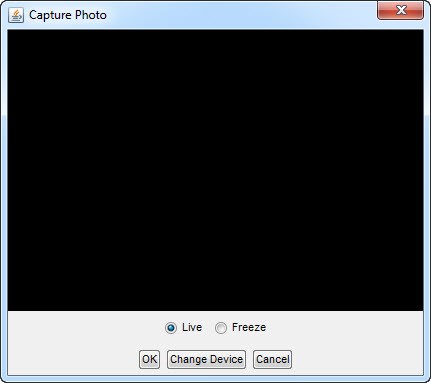
The Capture Photo window automatically appears after you click Next in the previous admission step. If not, click Capture.
The camera should already be focused on where the candidate is seated, but you may need to ask the candidate to move slightly in order to center the image in the window.
|
|
Ask the candidate to remove any face mask during this step. Observe the candidate during this process for anything unusual. If the candidate has a face mask that covers the ears, ask the candidate to show you each ear. For more information, see Handling candidates with face masks. |
Follow these guidelines when taking a photograph (including backup photographs):
-
The candidate's entire face and neck area should be visible and centered in the picture. Adjust the camera, if necessary. It's important that the candidate's face and shoulders fill the frame as much as possible. If more of the candidate's body is visible, or if there is a lot of blank space around the candidate, the candidate is probably sitting too far from the camera. The candidate should face the camera directly and must remove all items that cover the face, such as sunglasses.
-
The candidate's eyes should be open and looking directly at the camera.
-
If the candidate's face is covered by religious apparel, do not ask the candidate to remove the apparel. Take the photograph as usual. For more information, see Photographing candidates who are wearing religious apparel.
-
The photograph must be clear and in focus with no glare or shadows on the candidate's face.
-
Only the candidate and a neutral background can appear in the photograph. The background behind the candidate must be clear with no visible items, such as plants, pictures, doors, file cabinets, or other objects, behind or around the candidate.
The following examples show how photographs should appear:
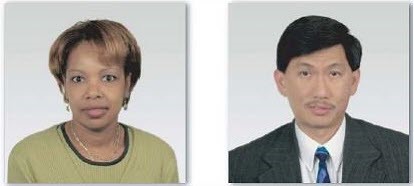
The photograph should not:
-
Contain any distractions in the background, such as plants, windows, artwork, wall corners, etc.
-
Show obstructions, such as hands, closed eyes, hair in front of eyes, and so on.
-
Show outerwear or items that cover the face.
-
Be taken from too far away.
-
Be poorly lit or show shadows on the candidate's face.
-
When the candidate's image is centered in the window, select Freeze, and then click OK.
To help you take quality photographs that meet the previous guidelines, the AWARE photo technology software is installed and enabled at your test center. It automatically focuses and crops the photograph to present the best picture quality. The software also provides messages on the screen if something in the photograph needs to be adjusted.
The following table provides some messages you may receive when you take a photograph with the AWARE technology. You need to slightly adjust the candidate in order to satisfy the message requirements. For more information about how to take pictures and meet the requirements of the AWARE photo technology, see Tips for taking a photograph using AWARE photo technology.
|
AWARE Error Message |
What to do |
|
Invalid candidate pose. The candidate's face must be directly in the camera. Please retake the photo with a direct frontal view of the candidate. |
Make sure that the candidate is facing the camera directly. Click OK to retake the photo. |
|
Please make sure that the candidate's face is clearly in the picture. |
Be sure to center the candidate's face in the picture. Click OK to retake the photo. |
|
Image height and head-height-to-image-height ration are inconsistent. Aware error code: (AW_FAC_E_INCONSISTENT_IMAGEHEIGHT_RATIO) |
The candidate is too close to the camera. Move the candidate back a little bit. Click OK to retake the photo. |
|
The candidate may be too close to the camera. Please refer to the User Manual for correct camera and candidate positioning. |
Move the candidate slightly farther from the camera. Click OK to retake the photo. |
|
The candidate may be too far from the camera. Please refer to the User Manual for correct camera and candidate positioning. |
Move the candidate slightly closer to the camera. Click OK to retake the photo. |
|
Image resolution is too low for specified eye separation Aware error code: (AW_FAC_E_IMAGE_RESOLUTION_TOO_LOW_FOR_ EYESEPARATION) |
Contact VSS for assistance. |
When AWARE is done adjusting the photograph for quality, the new photograph appears on the left pane in Admissions Manager.
To retake the photograph, click Capture and repeat steps 1 and 2. You do not have to go through the entire admission process again to retake the photograph.
-
Compare the new photograph and the photograph on the candidate's ID to the existing photograph in Admissions Manager, if there is one.
A candidate may already have an existing photograph in the database that was taken during a previous admission. It appears in Admissions Manager along with the new photograph you captured. The existing photograph should match the candidate and the photograph on the ID.
|
|
If the existing photograph does not match the candidate and the candidate's ID, follow the candidate misconduct process. For more information, see Responding to candidate misconduct. |
-
Click Next to continue the admission process.
|
|
If you encounter issues with your camera setup, inform your technical contact immediately. If you encounter a situation that you are not able to fix on your own or if you are not able to take pictures according to the standard procedures, contact Pearson VUE about alternative positioning for the camera and lighting. |
Copyright © 2026 Pearson, Inc. or its affiliates. All rights reserved. Pearson Confidential.