Manually checking IDs and distributing the rules agreement
|
|
When you take a break, go to lunch, end the work day, or leave the test center for any period of time, be sure to log out of all applications. The test administrator who is currently registering, proctoring, or administering exams must log into the applications with his or her personal username and password. |
Follow these steps to begin the admission process for a candidate:
-
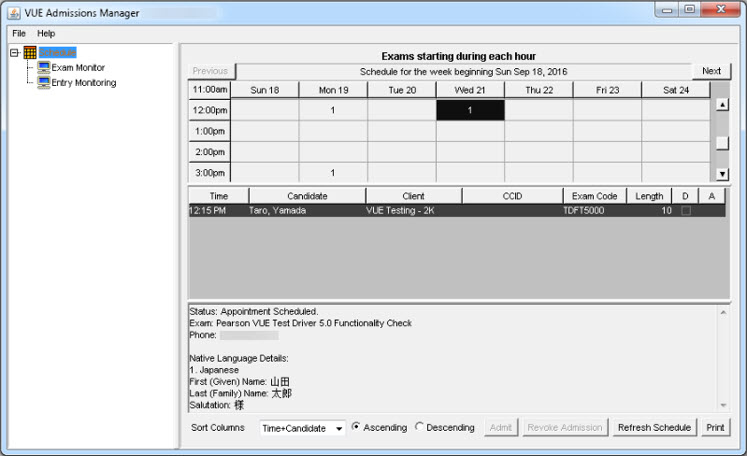
Select the candidate's name on the schedule pane in Admissions Manager.
|
|
If the candidate's ID lists his or her name in non-Roman, local language characters and the ID was issued from the country in which your test center is located, see Checking local language character IDs in Admissions Manager before you proceed to step 2 in this process. |

-
Click Admit.
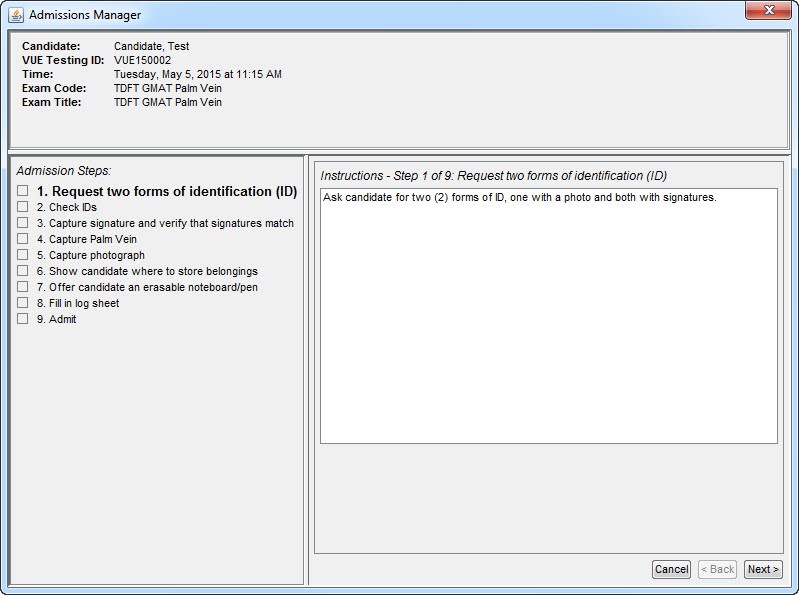
A new window opens in Admissions Manager. The admission steps appear on the left pane with the first step in bold, as shown in the following image. In this example, admissions data collection is required for the exam sponsor, so the signature, palm vein, and photograph steps are listed. If an exam sponsor requires any custom steps, such as checking a calculator or references, the custom steps are also listed.

The following buttons appear at the bottom of the window:
|
Button |
Description |
|
Cancel |
Exits the admission process. When you click Cancel, a message appears asking if you are sure you want to cancel. Click Yes to stop the current admission process and return to the schedule pane without admitting the candidate. To admit the candidate again, you will need to start the admission process from the beginning. |
|
Back |
Returns to the previous step in the admission process. |
|
Next |
Marks the current step as complete and moves to the next step in the admission process. |
-
Ask the candidate for the necessary ID(s), and then click Next.
Each candidate must have either one primary ID or one primary ID and one secondary ID. Check the exam sponsor's client reference for ID policies. Do not seat a candidate for an exam if he or she does not have the appropriate forms of identification. For more information about what IDs are acceptable, see Acceptable forms of ID.
For any issue or problem related to the candidate's ID, create a case, selecting these options:
Admissions/Check-in
Problem with candidate ID
After you click Next, a green check mark appears to the left of the first step in the Admission Steps field. The second step in the admission process becomes bold, and its instructions appear on the right pane.
-
Give the candidate a copy of the appropriate rules agreement.
Some exam sponsors have their own rules agreement that the candidate must sign instead of the standard candidate rules agreement. For more information about which rules agreement to provide to a candidate, see the exam sponsor's client reference. All rules agreements are available for download in the Resources application in the Connect portal. Some rules agreements are available in other languages too.
Each candidate must read the rules agreement and sign the bottom of the agreement or sign the digital signature pad to indicate that he or she has read and agrees to abide by the rules. Turn candidates away if they refuse to sign the rules agreement or refuse to provide a digital signature without having prior approval from the exam sponsor to skip this admissions data.
Ask the candidate to return the rules agreement to you. Your test center must keep any signed rules agreements for 12 months. For more information about handling rules agreements or similar forms, see Handling log sheets and rules agreements.
-
As the candidate reviews the rules agreement, click Next to continue with the admission process.
After you click Next, step 3 in the admission process becomes bold, and its instructions appear on the right pane.
|
|
If you have not collected the signed rules agreement from the candidate yet, remember to collect it before finishing the admission process. |
-
Manually check the candidate's identification.
Each candidate must have the proper forms of identification. For more information about what IDs are acceptable, see Acceptable forms of ID. However, check the exam sponsor's client reference for any special requirements. When manually checking the candidate's ID(s), complete the following tasks:
- Manually check that the ID(s) are valid (not expired).
|
|
Candidates testing in Brazil are not required to present renewal paperwork with an expired ID. However, they must still present identification that meets all other ID requirements listed in an exam sponsor's client reference. In Brazil, do not turn candidates away for presenting an expired ID that meets all other identification requirements. Simply create a case explaining that the expired ID was allowed because the candidate was testing in Brazil. When you create the case, select these options: Admissions/Check-in Problem with candidate ID Expired |
-
Verify that the candidate's name on the ID(s) matches the candidate's name shown on the schedule by using the standard name-matching guidelines or the exam sponsor's unique guidelines in the client reference. For more information, see Name-matching guidelines. The standard name-matching guidelines are available in the Resources application in the Connect portal.
-
Verify that the photograph on the primary ID looks like the candidate. Ensure that the photo is not pasted or altered.
-
In general, you may not seat a candidate for an exam if he or she does not have the appropriate forms of identification, the name on the ID(s) do not match the name on the schedule, or the photograph on the primary ID does not look like the candidate. However, most exam sponsors want you to call the test center support line to verify that you should not seat the candidate, but some exam sponsors do not require you to do this. See the exam sponsor's client reference for details. If there is no information provided in the exam sponsor's client reference, call the test center support line for assistance. In all situations, create a case.
-
Click Next if you determine that the IDs are acceptable. Keep the IDs for use later in the admission process.
Copyright © 2025 Pearson Education, Inc. or its affiliate(s). All rights reserved. Pearson VUE Confidential. pvuecopyright@pearson.com