Checking local language IDs in Admissions Manager
|
|
Refer to this section only when an ID lists the candidate's name in non-Roman local language characters and the ID is issued from the country in which your test center is located. See Acceptable forms of ID for complete rules about accepting local language IDs. |
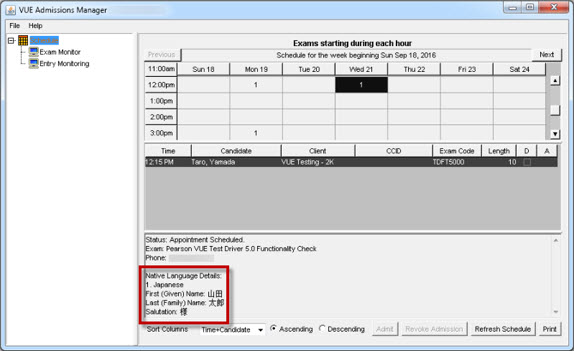
During the registration process, candidates sometimes register their names in multiple languages. For example, a candidate might register his or her name using local language characters and also register a translated version of the name in Roman characters. When a name is registered in one or more types of local language characters, the Notes section of the Admissions Manager schedule lists the names in the characters in the Native Language Details area, as shown in the following image.
Follow these steps when an ID lists the candidate's name in local language characters:
-
Select the candidate's name in the Admissions Manager schedule.
-
Check the Notes section of the schedule window to see if the Native Language Details area appears and lists the candidate's name in the characters that are on the ID.
If the candidate did not register his or her name in the local language characters that are on the ID, the name will not be listed in those characters in the Notes section of the schedule window either. When this occurs, stop this process; see Acceptable forms of ID for more information about checking local language IDs.
-
Compare the local language characters on the ID with the characters in the Native Language Details area in the Notes section to make sure that they match.
Always check the exam sponsor's client reference for ID and name-matching requirements. After you compare the name on the ID with the name in the Notes section, return to the process in Checking IDs and distributing the rules agreement.
Copyright © 2026 Pearson, Inc. or its affiliates. All rights reserved. Pearson Confidential.