Creating or editing a candidate record
When a candidate or test administrator registers for an exam for the first time, the person's demographic information must be entered into the testing system database. This is called a candidate record.
|
|
After a candidate's record has been saved in Registration Manager, you cannot change the candidate's name. Some exam sponsors also have restrictions on when other candidate information, such as the mailing address, can be changed. For example, some exam sponsors require the candidate to contact the call center or the exam sponsor in order to make a change. In addition, some exam sponsors have different requirements for which fields must be filled in. See the exam sponsor's client reference for specific requirements. |
Follow these steps to create a new candidate record or to edit a candidate's existing record in Registration Manager:
-
To create a new record, click New in the Customers screen. To update an existing record, follow the steps in Locating a candidate record to obtain the record, and then click Edit in the Customers screen.
Before you create a new record, make sure that the candidate does not already have a record in the database. See Locating a candidate record.
After you click New, a message prompts you to make sure that the candidate does not already have an existing record. The message also asks that the candidate agree to a consent requirement. Before you create the new record, the candidate must agree to the consent requirement in the message. You may read the consent requirement to the candidate or present a paper form of the consent requirement for the candidate to read. You can obtain the paper form of the consent requirement from the Resources application in the Connect portal. Pearson VUE recommends that you laminate the paper form for reuse at your test center.
If the candidate does not agree to the consent requirement or has any questions or concerns, click No and do not create the new record. Instruct the candidate to contact Pearson VUE Contracts by phone or email:
-
Phone: +1 (952) 681-3918
-
Email: PearsonVUEContracts@pearson.com
After you have verified that there is no existing record for the candidate and that the candidate agrees to the consent requirement, click Yes to continue.
-
Enter or edit the candidate's demographic information on the Primary tab.
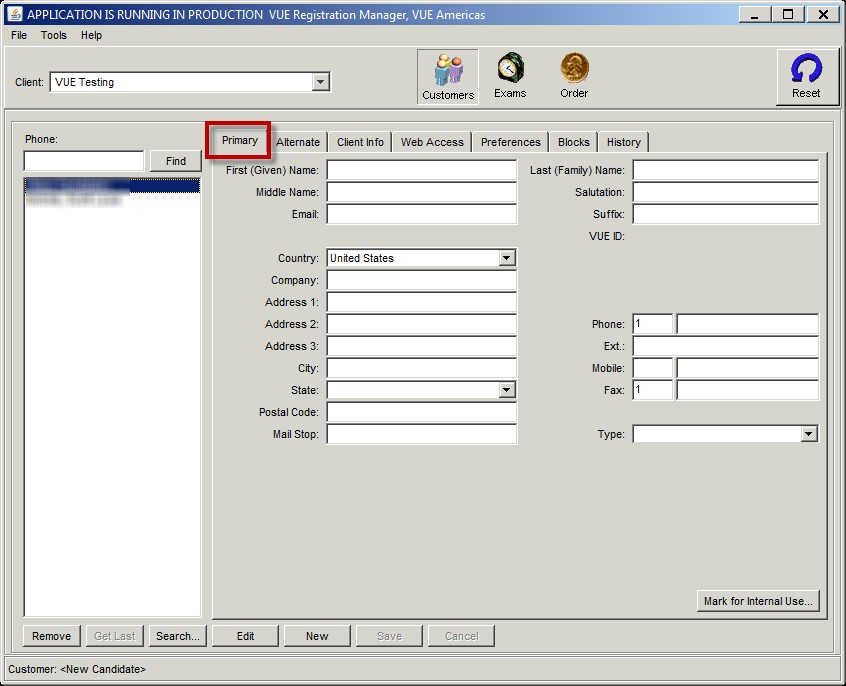
The Primary tab allows you to enter a candidate's name, address, email address, and phone number. If you are editing an existing record, all information that was previously entered for the candidate is displayed in these fields. Otherwise, the fields are blank.
|
|
When you enter a candidate's name and address in Registration Manager, do not use international characters, such as ä, ß, ë, ó and å. These characters can cause errors when the data is transferred to an exam sponsor's database, which can then become errors on candidate certificates. The following table lists some common international characters and how you should enter them in Registration Manager. |
|
Original character(s) |
Substitute character(s) |
|
In Denmark, Sweden, and Norway |
|
|
å Å |
a A |
|
æ Æ |
ae AE |
|
ø Ø |
O |
|
ä Ä |
a |
|
ö Ö |
o O |
|
In other countries |
|
|
ä Ä |
ae AE |
|
ö Ö |
oe OE |
|
ü Ü |
ue UE |
|
ß |
ss |
|
ó ò |
o |
|
é è |
e |
|
ï |
i |
|
á à |
a |
|
ê |
e |
|
ô |
o |
Refer to the guidelines in the following table when you enter or update candidate demographic information in the Primary tab.
|
Field |
Guideline |
|
|
First (Given) Name Last (Family) Name Middle Name |
Type the candidate's name exactly as the candidate wants it to appear on all exam-related documents and records. However, tell the candidate that when he or she arrives to take the exam, the name entered here must match the name on the identification the candidate provides, such as a driver's license. Registration Manager requires a candidate record to contain a first and last name. If the candidate does not have two names, you can type a period (.) in place of one of the names. After the record has been saved, you cannot edit the candidate’s name in this window, so be sure the name is spelled correctly before you save your work. |
|
|
Salutation |
If the candidate has a preferred way of being addressed, such as "Ms." or "Dr.", enter the information into this field. |
|
|
|
Be sure to ask candidates for their email address and to enter their email address in this field. If an email address is provided, the candidate will quickly receive confirmation of exam appointments by email, if he or she is selected as the contact person for the order. For more information, see Entering payment and completing the order. If no email address is provided, information is sent by another method, such as ground mail, which takes longer. Type the email address carefully, and check it after you type it in to be sure it is correct. If the address is incorrect, the candidate may not receive the exam appointment information. |
|
|
Company |
Type the name of the company where the candidate works. |
|
|
Address 1 Address 2 Address 3 City State Country |
Use these fields to enter the candidate's complete address. This address should be the candidate's permanent mailing address and is the address used to send all exam-related documents. If you need to select a state or territory, first make a selection from the Country drop-down list. A list of states or territories is then available for selection from the State drop-down list. |
|
|
Postal Code |
Enter the candidate's postal code in one of the following formats: |
|
|
U.S. and Canada: 99999 99999-9999 999999999 |
Other countries: 9999999 City-999999 999999 |
|
|
Phone Mobile Fax |
Type these numbers into the appropriate field in one of the following formats. The area code (if applicable) must be typed into the same field (the second field) as the number. Use the first field if you need to enter a country code, and use the Ext. field if you need to enter an extension number. Also, the Mobile field is disabled if it is not required from the candidate. |
|
|
U.S. and Canada: 999-999-9999 (999)999-9999 9999999999 |
Other countries: 99-9-999-999999 999999999999 99999999999 999-9999999999 |
|
|
Type |
Note whether the candidate's address and phone number are associated with the candidate's home or workplace. |
|
-
Enter or edit the candidate's other address information by clicking the Alternate tab.
Some exam sponsors require a second address whenever it is available. Follow the guidelines in step 2 to use these fields.
-
Click the Client Info tab. If there is no ID in the exam sponsor's ID field, click Generate New ID.
Pay attention to the requirements for candidate IDs so that IDs are generated when required but are not generated for candidates who already have them. If the candidate has previously registered through Pearson VUE with the selected exam sponsor, had his or her data imported from another vendor's system or from the exam sponsor's system, the candidate may already have been assigned an ID, and therefore, the ID field is not editable.
The field is also not editable if the exam sponsor assigns an ID after the candidate registers. If the candidate does not have an ID for the selected exam sponsor, you may need to generate one on the screen. However, first check the exam sponsor's client reference to find out how the exam sponsor handles candidate IDs.
If you generate an ID for a candidate, provide the ID to the candidate for future reference.
-
If there are any unanswered or editable client questions in the Client Info tab, ask the candidate the questions and enter his or her answers on the screen.
When you are working with an existing record, the exam sponsor may require you to ask the candidate the questions again in case any of the information has changed, even though the candidate's responses are saved with the record. For more information about client questions, see Customers screen.
-
Click Save to confirm or Cancel to discard your changes.
When you save the record, Registration Manager checks that you have entered all information required by the exam sponsor. If any information is missing or incorrect, a message lets you know which fields you need to fill in or change. To schedule the candidate for an exam appointment, continue with the next section in this chapter.
Copyright © 2025 Pearson Education, Inc. or its affiliate(s). All rights reserved. Pearson VUE Confidential. pvuecopyright@pearson.com