Backup signature process
|
|
(This note is only for PVTC Selects that are set up with Cloud Control Technology.) When the signature device is not working properly, the device may have lost connection. You can check the device connection to troubleshoot the problem. For more information, see Connecting the signature and photograph devices at PVTC Selects in appendix C. If neither you nor VSS can get the device to work, be sure to follow the steps in this section to obtain a backup signature. |
If the signature device is not working properly and the exam sponsor requires you to capture a candidate's signature, you must use the backup process to obtain the candidate's signature. In this process, the candidate signs a Backup Signature Sheet, which must be copied and sent to Pearson VUE as an attachment to a case.
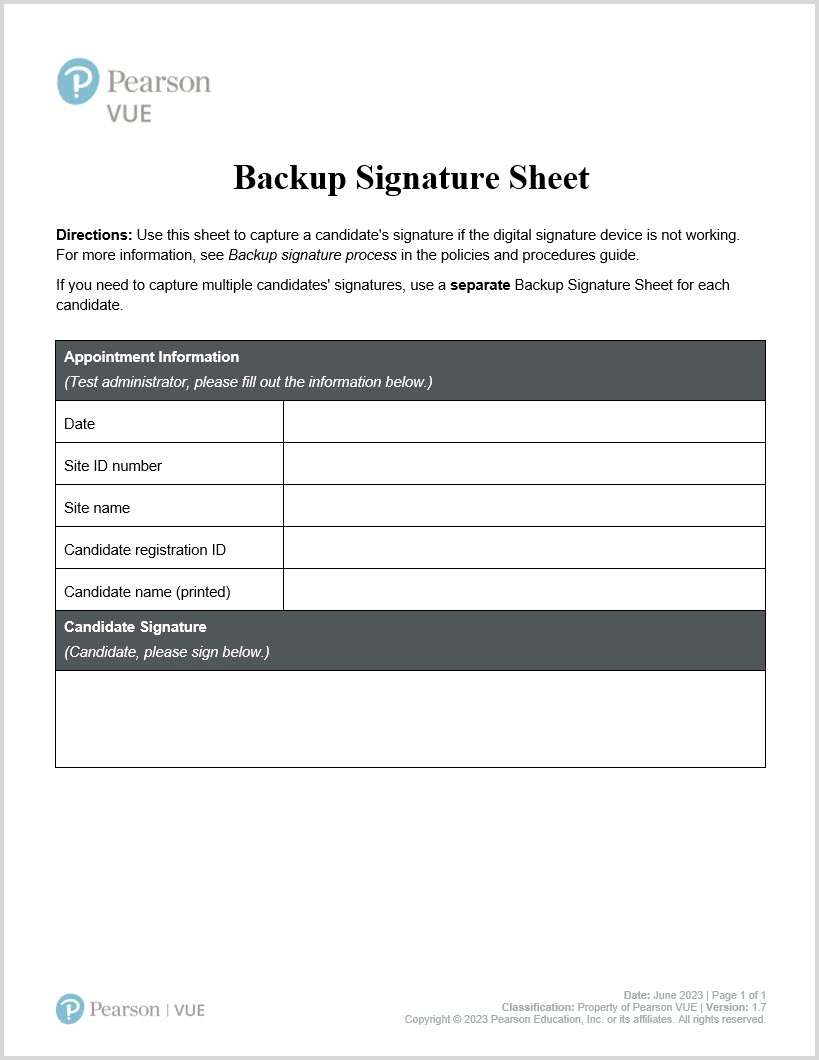
The following image is an example of the Backup Signature Sheet. Always keep a supply of backup sheets at the administration workstation. This sheet is located in the Resources application in the Connect portal.
|
|
If multiple candidates use the backup signature process, you must use a separate Backup Signature Sheet and create a separate Backup admissions data case for each candidate. For more information, see the following instructions. |
Follow these steps to collect a signature when the signature device is not working:
-
Call VSS immediately when you notice a problem.
VSS will first try to help you get the signature device working again. If that does not work, VSS will instruct you to use the backup process.
-
Verify that VSS will create the case for the broken signature device.
|
|
Only one case needs to be created for the broken signature device even if multiple candidates use the backup signature process. |
-
Complete the top portion of the Backup Signature Sheet for the candidate.
Fill in the the date, your test center's site ID, your test center's name, the candidate's registration ID number, and the candidate's name.
|
|
The registration ID is a unique, seven-digit number generated for every candidate registration. To locate a candidate's registration ID, open Registration Manager, locate the candidate's record, open the History tab, and view the candidate's active registrations. Select the candidate's registration for the current exam, and write down the number displayed in the Reg ID field. |
-
Tell the candidate to sign their name with a pen in the signature box on the Backup Signature Sheet.
-
In the Admissions Manager window, click Next to continue in the admission process and complete the other required steps.
When you click Admit to complete the admission process, a message prompts you to confirm that you want to finish the process without completing all of the required steps. Click Yes.
-
After you have admitted the candidate and any waiting candidates, create a case, selecting these options:
Admissions/Check-in
Backup admissions data
-
Create a copy of the Backup Signature Sheet and save it.
Refer to the user guide for your scanner or printer for specific details on using the scanner and scanner software.
-
Set the file name to the candidate's last name, the current date (MMDDYYYY), and the candidate's registration ID.
Example: larsen010120161234567
-
Set the file type to .png.
-
Attach the copied file to the case that you created in step 6.
Be sure the file you attach is in .png format and not in .html format.
-
Repeat steps 3-8 for any candidate whose signature you need to capture manually when you get to the "Capture signature and verify that signatures match" step in Admissions Manager.
|
|
Copies of forms must be attached to the Backup admissions data case within 24 hours. File and store the Backup Signature Sheet for 30 days. After 30 days, both the hard copies and the files of the sheets must be shredded and deleted. For more information, see Filing and storing backup admissions data information. |
Copyright © 2026 Pearson, Inc. or its affiliates. All rights reserved. Pearson Confidential.